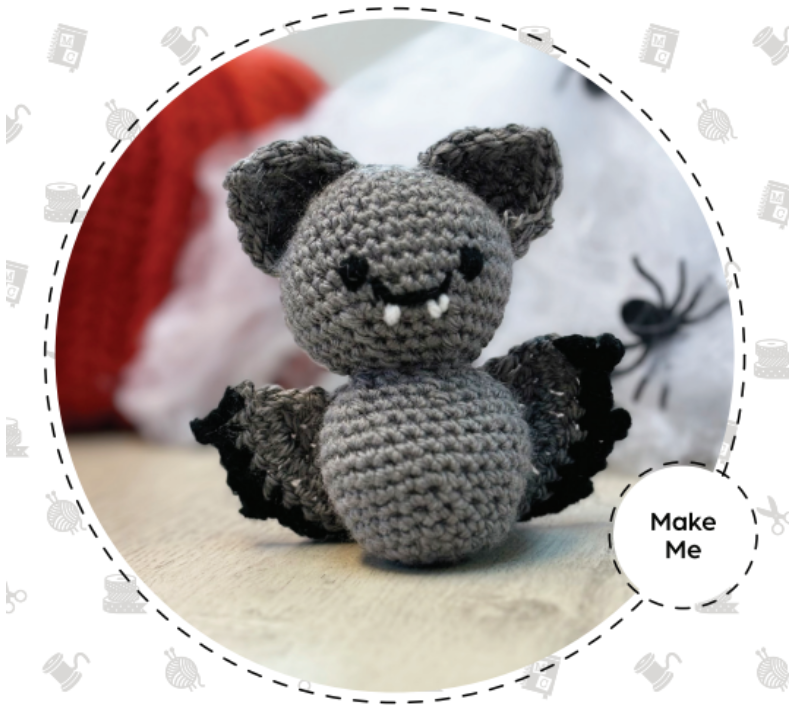
Ready to craft something spooky but equally cute? Why not try crocheting an amigurumi bat? This little winged companion is perfect for Halloween or anytime you want to add a touch of playful spookiness to your crochet collection.
If you’re new to amigurumi, or a seasoned pro, this step-by-step guide will help you to create your very own crochet bat. With tiny fangs and flappy ombre wings, this project will keep your hands busy and your mind engaged.
So grab your yarn and hook, and take flight into the wonderful world of amigurumi.
Amigurumi Bat Tutorial

Glossary
R: Round
DC: Double Crochet
TR: Treble Crochet
DEC DC: Decrease Double Crochet
INC DC: Increase Double Crochet
INC TR: Increase Treble Crochet
SS: Slip Stitch
CH: Chain Stitch
W: White Yarn
B: Black Yarn
G: Grey Yarn
You will need:
1 x Yarn Needle
1 x Crochet Hook 3-4mm
(depending on preferred stitch size (smaller hook = tighter stitches))
1 x Grey Yarn
1 x Black Yarn
1 x White Yarn
Stuffing
Changing the colours:
Start the last DC of the round, but do not complete the final stitch with the colour in use. Instead, take up the new colour and complete the last DC with the new colour, dropping the old one (no need to cut and weave). Then on the next colour change, repeat and take up the new colour yarn from where it left off and continue.
To make the head:
|
Round |
Pattern |
Stitches |
Yarn Colour |
|
1 |
6DC in MR |
6 |
G |
|
2 |
6INC |
12 |
G |
|
3 |
(1DC, INC) x 6 |
18 |
G |
|
4 |
(INC, 2DC) x 6 |
24 |
G |
|
5 |
(INC, 3DC) x 6 |
30 |
G |
|
6 |
30DC |
30 |
G |
|
7 |
(INC, 4DC) x 6 |
36 |
G |
|
8-11 |
36DC |
36 |
G |
|
12 |
(DEC, 4DC) x 6 |
30 |
G |
|
13 |
(DEC, 3DC) x 6 |
24 |
G |
|
14 |
(DEC, 2DC) x 6 |
18 |
G |
|
15 |
(DEC, 1DC) x 6 Begin stuffing the head |
12 |
G |
|
16 |
DEC x 6 |
6 |
G |
Finish stuffing the head. SS into the next stitch, cut yarn, pull through the loop to tighten. Use the needle to close the hole with the yarn tail if necessary and pull the yarn tail through the body to secure. Snip excess yarn.
To make the body:
|
Round |
Pattern |
Stitches |
Yarn Colour |
|
1 |
6DC in MR |
6 |
G |
|
2 |
6INC |
12 |
G |
|
3 |
(1DC, INC) x 6 |
18 |
G |
|
4-5 |
18DC |
18 |
G |
|
6 |
(INC, 2DC) x 6 |
24 |
G |
|
7 |
(INC, 3DC) x 6 |
30 |
G |
|
8-11 |
30DC |
30 |
G |
|
12 |
(DEC, 3DC) x 6 |
24 |
G |
|
13 |
(DEC, 2DC) x 6 Begin stuffing the body |
18 |
G |
|
14 |
(DEC, 1DC) x 6 |
12 |
G |
SS into the next stitch. Cute the yarn with a long tail for sewing the body to the head. Pull the yarn through the loop to tighten.
To make the wings:
Use grey yarn (G) and black yarn (B) for the body. This makes 1.
Please note: the CH3 at the beginning of rounds 1-4 count as a stitch and must be worked into. Make sure to start with a long tail which will be used for sewing the wings to the body.
|
Round |
Pattern |
Stitches |
Yarn Colour |
|
1 |
Make MR, CH3, 5TR into MR |
6 |
G |
|
2 |
Turn, CH3, 1TR into same st (bottom of CH3). (INC TR) x 5 |
12 |
G |
|
3 |
Turn, CH3, 1TR into same st, 1TR, (INC TR, TR) x5 |
18 |
G |
|
4 |
Turn, CH3, 1TR into same st, 2TR, (INC TR, 2TR) x5 |
24 |
G |
|
5 |
Insert hook into first stitch, CH1, DC into same st, picot in next st (2DC, DC & picot into next st) x7, 1DC |
B |
CH1, cut yarn. Pull yarn (G) through the loop and tighten. Weave yarn ends through the wing to fasten, snip off excess yarn.
To make the ears:
Use grey yarn for the ears and make two. Start with a long tail which will be used to sew the ears to the head.
|
Round |
Pattern |
Stitches |
Yarn Colour |
|
1 |
CH9, turn. DC in 2nd st from hook, DC in remaining sts |
8 |
G |
|
2 |
Turn CH1, DEC DC, 4DC, DEC DC |
6 |
G |
|
3 |
Turn, CH1, DEC DC, 2DC, DEC DC |
4 |
G |
|
4 |
Turn, CH1, DEC DC x2 |
2 |
G |
|
5 |
Turn, CH1, DEC DC |
1 |
G |
|
6 |
Turn, CH1, SS to top st, SS in sts along all three sides |
G |
SS to first st, cut yarn and pull through the loop to tighten. Using a needle, weave yarn through the ear to fasten. Snip off excess yarn.
Assembly -
Attaching the head to the body:
- Place the head on the body in the desired position.
- Sew the head to the body using the long tail from the body and your needle.
- Once you have finished sewing, knot and pull to fasten.
- Use the needle to pull the yarn through the head.
- Snip off excess yarn
Attaching the wings to the body:
- Place the wings on the back of the body in the desired position.
- The middle of the wings (where your yarn tail starts) should be just under the head in the middle of the back.
- Using your needle, sew the wings into place across the shoulders, and down the middle of the wings.
- Once you have finished sewing, make a knot to fasten and pull the yarn through the body.
- Snip off the excess yarn.
Attaching the ears to the head:
- Place the first ear in the desired position.
- Using the long yarn tail and your needle,sew the ear into place.
- Once you have finished sewing, make a knot and pull the yarn tail through the head.
- Snip off the excess yarn.
- Repeat for the second ear.
Making the eyes (French Knot):
- Using black yarn (B) and a needle, thread the yarn through the back of the head to the position of the first eye.
- Hold the needle next to the position where the yarn has come through. Wrap the yarn 3-4 times around the needle.
- Insert the needle back through just above/below and pull the yarn through until a knot is formed, taking the yarn back through the body.
- Snip the yarn and repeat for the second eye.
Alternative method:
Thread the yarn through the back of the head to the position of the first eye and sew over the height of one crochet stitch 3-4 times, taking the yarn back through the body.
Snip the yarn and repeat for the second eye.
Making the mouth:
- Using black yarn and a needle, pull the yarn through the back of the head to the start position for the mouth. Sew on your desired smile, and when finished, pull the yarn back through the head.
- Snip off the excess.
- Using white yarn, make two fangs using the same method.
Crochet Away!
Crocheting amigurumi figures is a fun and rewarding way to spend your time. This project combines creativity with a touch of Halloween spirit. Whether you're a beginner or an experienced crocheter, this free guide offers everything you need to make an adorable bat, complete with wings, fangs, and eyes. By following the detailed steps and tips on colour changing, stuffing, and assembly, you'll have your very own handmade creation in no time.
For more crochet tutorials and inspiration, be sure to check out our other amigurumi paterns, and be sure to share your finished creations with fellow crafters. Happy crocheting!


